The objective of this
lesson is to educate those new to the art of origami about the different kinds
of folds that are involved in origami along with instructions on how to do
them.
Welcome back for another
lesson viewers! Today we’re going to be learning about the different kinds of
folds that are used in origami, they’re fairly easy to do and remember, from
basic folds to base forms that are widely used in many origamis so make sure to
fold along with me!
The 2 basic folds are
called Mountain fold and Valley fold. The Mountain fold is where you fold the crease
downwards, making the paper look like a mountain. While in the Valley fold, you
make the crease upwards, making the paper look like a valley.
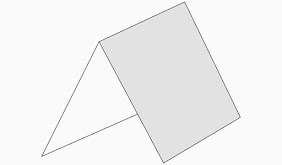 |
| Mountain Fold |
 |
Valley Fold
|
Seems easy enough right?
Now let’s try some more folds, and this time these are called Base folds.
This fold is called the Square Base.
 |
Step 1) Start with a square sheet of paper with the white side up. Fold it in half along the dotted line.
|
 |
| Step 2) Fold the paper in half again along the dotted line. |
 |
| Step 3) Bring the top flap of paper up. |
 |
| Step 4) Squash fold this flap of paper down. Make sure you keep both sides symmetrical. You should end up with a diamond shape. |
 |
| Step 5) Turn the model over and do the same thing to the other side. |
 |
| The completed Square or Preliminary Base. |
The next base we'll be doing is called the Bird base, which starts off from the Square or Preliminary Base.
 |
| Step 1) Fold the top right flap of paper to the centre along the dotted line. Crease well and unfold. |
 |
| Step 2) Fold the top left flap of paper to the centre along the dotted line. Crease well and unfold. |
 |
| Step 3) Fold the top of the model down along the dotted horizontal line. The end points of this horizontal line will line up with the tops of the creases on either side. |
 |
| Step 4) Petal Fold the top flap of paper up along the dotted line. There is already a crease here from the previous step. |
 |
| Step 5) Continue lifting up the top flap of paper while folding in the sides along the existing creases. |
 |
| Step 6) Push everything flat along the existing creases. |
 |
| Step 7) The completed Petal Fold. Turn the model over and do steps 1 to 7 all over on the other side. |
 |
| The completed Bird Base. |
Now that you know these things, I think it's time for you to make your first origami on the next lesson! Click the link to your right to fold your first model, the Crane! But if you haven't read the first lesson yet, click the left link!

No comments:
Post a Comment