Tuesday, June 15, 2021

Compilation and Animation Tutorial Finals Project

 The following video is a Tutorial for Animating in HTML made by yours truly.


And the following is the compilation using a previous exercise which is using iFrames in HTML.


The code is will be provided here:


 <!DOCTYPE html>


<html>


<head>


<style>


iframe:focus {


  outline: none;


}


iframe[seamless] {


  display: block;


}


.navbar {


  overflow: hidden;


  background-color: #333;


}


.navbar a {


  float: left;


  font-size: 16px;


  color: white;


  text-align: center;


  padding: 14px 16px;


  text-decoration: none;


}


.dropdown {


  float: left;


  overflow: hidden;


}


.dropdown .dropbtn {


  font-size: 16px;  


  border: none;


  outline: none;


  color: white;


  padding: 14px 16px;


  background-color: inherit;


  font-family: inherit;


  margin: 0;


}


.navbar a:hover, .dropdown:hover .dropbtn {


  background-color: red;


}


.dropdown-content {


  display: none;


  position: absolute;


  background-color: #f9f9f9;


  min-width: 160px;


  box-shadow: 0px 8px 16px 0px rgba(0,0,0,0.2);


  z-index: 1;


}


.dropdown-content a {


  float: none;


  color: black;


  padding: 12px 16px;


  text-decoration: none;


  display: block;


  text-align: left;


}


.dropdown-content a:hover {


  background-color:dark-red;


}


.dropdown:hover .dropdown-content {


  display: block;


}


</style>


</head>


<body>


<div class="navbar">


  <a href="#home">Home</a>


  <a href="https://www.facebook.com/media/set/?set=a.1840113652672222&type=3  target">Gallery</a>


  <div class="dropdown">


    <button class="dropbtn">Web Programming 


      <i class="fa fa-caret-down"></i>


    </button>


    <div class="dropdown-content">


      <a href="https://startingdigitally.blogspot.com/2021/04/web-programming-css-color-palette.html" target="iframe1">Exercise 6</a>


      <a href="https://startingdigitally.blogspot.com/2021/04/web-programming-exercise-7.html" target="iframe1">Exercise 7</a>


      <a href="https://startingdigitally.blogspot.com/2021/04/web-programming-exercise-8-css-sidebar.html" target="iframe1">Exercise 8 </a>


  <a href="https://startingdigitally.blogspot.com/2021/05/web-programming-exercise-9.html" target="iframe1">Exercise 9</a>


      <a href="https://startingdigitally.blogspot.com/2021/05/web-programming-exercise-10.html" target="iframe1">Exercise 10 </a>


  <a href="https://startingdigitally.blogspot.com/2021/05/web-programming-exercise-11.html" target="iframe1">Exercise 11 </a>


</div>

  </div> 


<div class="dropdown">


    <button class="dropbtn">Interactive Media Design 


      <i class="fa fa-caret-down"></i>


    </button>


    <div class="dropdown-content">


      <a href="https://startingdigitally.blogspot.com/2021/04/interactive-media-design-switch-case.html" target="iframe1">Exercise 6 </a>


      <a href="https://startingdigitally.blogspot.com/2021/04/interactive-media-design-exercise-7.html" target="iframe1">Exercise 7</a>


      <a href="https://startingdigitally.blogspot.com/2021/05/interactive-media-design-exercise-8.html" target="iframe1">Exercise 8 </a>


  <a href="https://startingdigitally.blogspot.com/2021/05/interactive-media-design-exercise-10.html" target="iframe1">Exercise 9</a>


  <a href="https://startingdigitally.blogspot.com/2021/06/interactive-media-design-exercise-10.html" target="iframe1">Exercise 10 </a>


  <a href="https://startingdigitally.blogspot.com/2021/06/interactive-media-design-exercise-11.html" target="iframe1">Exercise 11 </a>


  <a href="https://startingdigitally.blogspot.com/2021/06/interactive-media-design-exercise-12.html" target="iframe1">Exercise 12 </a>


    </div>


  </div> 


</div>


<div style="padding:1px 16px;height:1000px; WIDTH="100%">


  <h2 id="home"> Compilation of Activities Finals Project</h2>


<div></div>


 <iframe name ="iframe1" src="https://startingdigitally.blogspot.com/" width="100%" height=600px> 


 </iframe>


<iframe name ="iframe2" src="https://www.deviantart.com/psychoticchoco"  width="100%" height=600px>  

</iframe>


</div>


</body>


</html>

Interactive Media Design Exercise 12

 The following is a video showcasing the Exercise 12 for the subject Interactive Media Design which is about a log in and sign up form.


If you would like to view the links then click here so you may download them and view them at your leisure.

Additionally, it has also been put into a previous exercise for compilation purposes.


Monday, June 14, 2021

Interactive Media Design Exercise 11

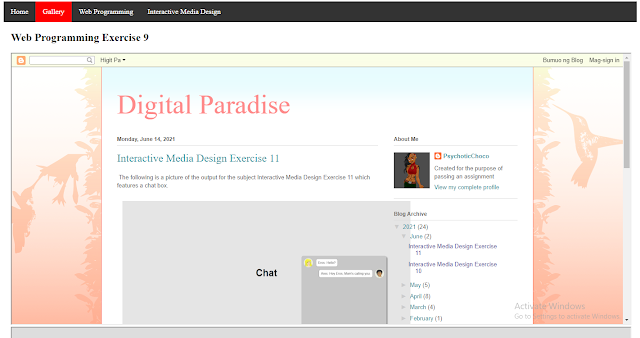
 The following is a picture of the output for the subject Interactive Media Design Exercise 11 which features a chat box.

Exercise 11

If you would like to view the file and use it for yourself then click here.

Additionally, it has also been put into a previous activity for compilation purposes.

Sunday, June 13, 2021

Interactive Media Design Exercise 10

 The following is the output for the subject Interactive Media Design Exercise 10.


Exercise 10

If you wish to download the file for yourself then click here.

Additionally, it has been added to a previous webpage for compilation purposes.


The code will also be pasted here for your convenience.

<!DOCTYPE html>

<html>
<head>
<meta name="viewport" content="width=device-width, initial-scale=1">
<title> Counting Game </title>
<style>

html {
margin-left: 10px;
background-color: #525252;
    }
      
body {
max-width: 500px;
min-width: 480px;
    }
fieldset {
background-color: white;
}

button {
background-color: #5c5c5c;
color: black;
border-radius: 10px;
width: 100px;
height: 50px;
}

</style>
</head>

<body>

<fieldset>
<canvas id="canvas" width="1200" height="300" style="border:none;">
</canvas>

<label> Count the boxes </label>
<input type="number" id="answer"> </input>
<!-- <button id="colors" onclick="colors()" > Colors </button> -->
<button id="eraser" onclick="eraser()" > Next </button>
<button id="compare" onclick="compare();eraser()" > Answer </button>

<p> <b> Correct answers: </b> </p> <div id="myScore"> 0 </div>

<p id="demo"> </p>

</fieldset>

<script type = "text/javascript">
var score=0;
function colors()
{
var canvas = document.getElementById("canvas");
var ctx = canvas.getContext("2d");
x=Math.round(Math.random()*10+1);
for(f=1; f<=x;f++)
{
switch(f)
{
case 1: c="#000000"; break
case 2: c="#000000";break
case 3: c="#000000"; break
case 4: c="#000000";break
case 5: c="#000000"; break
case 6: c="#000000"; break
case 7: c="#000000"; break
case 8: c="#000000"; break
case 9: c="#000000"; break
case 10: c="0000000"; break
}
ctx.font = "20px Calibri";
ctx.fillStyle=c;
ctx.fillRect(10+f*100,100, 50, 50);
}
}

function eraser()
{
var canvas = document.getElementById("canvas");
var ctx = canvas.getContext("2d");
ctx.clearRect(0,0,1200,300); 
colors();
}

colors()

function compare()
{
ans=document.getElementById("answer").value

if (ans==x) {
score += 1;
document.getElementById("myScore").innerHTML=score.toString()
document.getElementById("demo").innerHTML="Correct"
}
else {
document.getElementById("demo").innerHTML="Incorrect"
}
}
</script>

</body>
</html>

Friday, May 28, 2021

Interactive Media Design Exercise 9

 The following screenshot is an activity made for Interactive Media Design.

A flower made in HTML

 If you would like to view the file for yourself, click here.


The code will also be pasted here for your convenience.


<html>

<head>

<title> Javascript Code  : Draw on HTML Canvas using Javascript - Circle, Arc,  Rectangle, Square , Lines , Shapes , BUtton Controlled Drawing   </title>

  </head>  

  <body>


<canvas height="500" id="myCanvas" style="border: 1px solid #d3d3d3;" width="1000">

Your browser does not support the HTML canvas tag.</canvas> <br />

<button id="sky" onclick="Sky()">Sky </button>

<button id="clouds" onclick="Clouds()"> Cloud </button>

<button id="flower" onclick="Flower()"> Flower </button>

<button id="clear" onclick="Erase()"> Clear </button>


<script>

var c = document.getElementById("myCanvas");


var ctx = c.getContext("2d");


function Flower()

{


ctx.fillStyle = "#ebf283";

ctx.fillRect(490,250,20,530);


ctx.fillStyle = "#fc9fe8";

ctx.beginPath();

ctx.arc(500, 150,50, 0, 2 * Math.PI);

ctx.fill();


ctx.fillStyle = "#fc9fe8";

ctx.beginPath();

ctx.arc(575, 200,50, 0, 2 * Math.PI);

ctx.fill();


ctx.fillStyle = "#fc9fe8";

ctx.beginPath();

ctx.arc(425, 200,50, 0, 2 * Math.PI);

ctx.fill();


ctx.fillStyle = "#fc9fe8";

ctx.beginPath();

ctx.arc(455, 280,50, 0, 2 * Math.PI);

ctx.fill();


ctx.fillStyle = "#fc9fe8";

ctx.beginPath();

ctx.arc(545, 280,50, 0, 2 * Math.PI);

ctx.fill();


ctx.fillStyle = "#ebf283";

ctx.beginPath();

ctx.arc(500, 225, 60, 0, 2 * Math.PI);

ctx.fill();


}


function Sky()


{


ctx.fillStyle = "#a1f9ff";

ctx.fillRect(0,0,1000,1000);


}


function Clouds()


{


ctx.fillStyle = "#ffffff";

ctx.beginPath();

ctx.arc(200, 100, 60, 0, 2 * Math.PI);

ctx.fill();


ctx.fillStyle = "#ffffff";

ctx.beginPath();

ctx.arc(245, 125, 60, 0, 2 * Math.PI);

ctx.fill();


ctx.fillStyle = "#ffffff";

ctx.beginPath();

ctx.arc(340, 125, 70, 0, 2 * Math.PI);

ctx.fill();


ctx.fillStyle = "#ffffff";

ctx.beginPath();

ctx.arc(180, 175, 70, 0, 2 * Math.PI);

ctx.fill();


ctx.fillStyle = "#ffffff";

ctx.beginPath();

ctx.arc(400, 185, 60, 0, 2 * Math.PI);

ctx.fill();


ctx.fillStyle = "#ffffff";

ctx.fillRect(180,155,220,90);


}


function Erase()

{

ctx.clearRect(0,0,1000,500);


}

</script>


</body>

</html>

Web Programming Exercise 11

The following is a screenshot of the Web Programming Exercise 11 which is about embedding videos onto an html file.

Web Programming Exercise 11

If you would like to access the file and tweak it for yourself, click here.

Now the following screenshot is where this exercise is integrated into a previous exercise.

Audio Video in iFrame Exercise

The file can be accessed in the previous link given.

Monday, May 17, 2021

Web Programming Exercise 10

The following is the output for the Web Programming Activity 10 where it features animation made entirely in HTML.

If you would like to view the raw file of the animation and its HTML file, click here to download them.


Additionally, it's also needed to put it in a past activity, and I will show it here.


Friday, May 7, 2021

Web Programming Exercise 9

 The following is a picture of the output for the 9th Exercise in the subject Web Programming.


Web Programming Exercise 9


If you would like to see the files for yourself and maybe even improve upon it, click here to access the files.

Monday, May 3, 2021

Interactive Media Design Exercise 8

 The following picture is a screenshot of the #8 activity for the subject Interactive Media Design.


Change Button Properties Exercise


If you would like to view the HTML file and access it for yourself, click here.

Saturday, April 24, 2021

Web Programming Exercise 8 CSS Sidebar

 The following picture is a screenshot of a blog that was created through means of coding, namely HTML. It's an exercise that exhibits the use of a sidebar, as seen on the left.


A screenshot of the output

If you would like to view it for yourself, then click here to view it on Google Drive.


Friday, April 23, 2021

Interactive Media Design Exercise 7

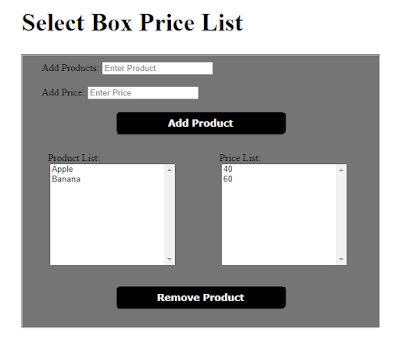
 The following activity is the product list box wherein you enter a product and its price, which will put  them into the list. Clicking the remove product button will remove the product and its price.

A preview of the output


Click here to access the files and try it out for yourself.

Web Programming Exercise 7

The following work is a mock blog page that serves as an introduction for the writer.


Click here so you can view the work for yourself and get the files if you wish to view them for your own.


Monday, April 12, 2021

Interactive Media Design SWITCH CASE Exercise 6

Switch Case

Order List

Please fill up the following fields:


Friday, April 9, 2021

Web Programming CSS Color Palette Exercise 6


CSS Color Palette Activity for Web Programming

HTML File
  
This first picture is the screenshot for the html file


CSS File
 

This second picture is the CSS file used to format the html file


Output

This final picture is the final output of the html file


If you would like to view these files for yourself, I will provide a link here. The high quality versions of the pictures are also included there.

Friday, April 2, 2021

Background Image

The background image is that of the Genderfluid Flag, an output for my past activity that exhibits colors. I did the Genderfluid Flag for that is what I identify with, fluctuating between identifying as a man, the next a woman, the next nothing at all. Not everyone understands, but it's fine with me since it isn't any of their business anyway, I shouldn't be apologetic for who and what I am.

Photo Blog

Welcome to my Photo Blog!

Here I will showcase some of my past works, since I haven't been doing artworks recently due to personal reasons. Take a look!


dating-sim

A sample if my OC were to be in a dating sim.


KING

An output for an activity showcasing the flow of movement


WALLPAPER-2

My attempt at making a wallpaper for a phone, featuring a panda.

Event Finder

Enter number of month:

Sunday, March 21, 2021

If Condition for Scholarship

Friday, March 19, 2021

My Profile

My Profile

Name : Patricia Jersey R. Cabanos


My favorite Songs

  1. One Day
  2. Gymnopédie No.1
  3. Paper Hearts
  4. Plastic Love
  5. One More Time

    My favorite Subjects

    • Drawing
    • English for the Profession
    • Personality and Career Development

    Links to my portfolio

    Facebook

    Portfolios

Registration Form

Form Elements and Attributes
Personal Information:


Gender: Male

Female

Talents/Skills : Drawing

Acting

Photography

Course:


Grade Equivalent

Grade Equivalent

Name:

Score:

Total items:

Friday, February 26, 2021

First Javascript Program

First Javascript Program place on the body

Wednesday, January 20, 2021

Folding an Origami Crane

    The objective of this lesson is to hone people's skills through practice and clear and concise instructions.

    Hello people and welcome to the last lesson that I will present you, which are instructions on making your first origami crane! But before we start, I'd like to add a little bit of information about why the Crane is so special.

    In Japan, the crane is said to live for 1,000 years, which is why people fold 1,000 of them in hopes of one of their wishes being granted. Cool right? And with this lesson, you can start with your first out of a thousand!

    Continuing from our last lesson, we will be starting off with the Bird Base that we have done before.


Step 1) The completed petal fold. At this point you also have a completed bird base. Next we’re going to fold the neck and the tail. Fold the top flap on the right to the centre along the dotted line.


Step 2) Fold the top flap on the left to the centre along the dotted line as well.


Step 3) Turn the model over, we’re going to repeat the last two steps on the other side.


Step 4) Fold the long thin section of paper on the right up along the dotted line. Crease well and unfold.


Step 5) Fold the long thin section of paper on the left up just like you did on the other side. Crease well and unfold.


Step 6) Flip the model and do the last few steps on the other side.


Step 7) Now we’re going to make an inside reverse fold along the creases you just made on the right side of the model.


Step 8) Lift the paper up inside the model along the creases you already made and flatten everything.


Step 9) Make another inside reverse fold along the creases you already made along the left side of the model and do the last few steps on this side.


Step 10) Now we’re going to fold the head. Fold the long thin section of paper on the right down along the dotted line. Fold it both ways. Crease well and unfold. Then make an inside reverse fold. The head is then folded inside the neck. 


Step 11) Fold down the wings on both sides along the dotted line.


The completed origami crane


Congratulations, you've made your first origami crane!

I hope this was a fun experience for you, because it was for me. If ever, for some reason, you haven't read the two previous lessons, then let me provide these links for you. Thank you for following along the lessons until now!


                 First Lesson                                                                         Second Lesson

Origami Lesson 2: Folds


    The objective of this lesson is to educate those new to the art of origami about the different kinds of folds that are involved in origami along with instructions on how to do them.

    Welcome back for another lesson viewers! Today we’re going to be learning about the different kinds of folds that are used in origami, they’re fairly easy to do and remember, from basic folds to base forms that are widely used in many origamis so make sure to fold along with me!

    The 2 basic folds are called Mountain fold and Valley fold. The Mountain fold is where you fold the crease downwards, making the paper look like a mountain. While in the Valley fold, you make the crease upwards, making the paper look like a valley.

Mountain Fold

Valley Fold

    Seems easy enough right? Now let’s try some more folds, and this time these are called Base folds.


 This fold is called the Square Base.

Step 1) Start with a square sheet of paper with the white side up. Fold it in half along the dotted line.

Step 2) Fold the paper in half again along the dotted line.


Step 3) Bring the top flap of paper up.

Step 4) Squash fold this flap of paper down. Make sure you keep both sides symmetrical. You should end up with a diamond shape.


Step 5) Turn the model over and do the same thing to the other side.

The completed Square or Preliminary Base.


    The next base we'll be doing is called the Bird base, which starts off from the Square or Preliminary Base.

Step 1) Fold the top right flap of paper to the centre along the dotted line. Crease well and unfold.


Step 2) Fold the top left flap of paper to the centre along the dotted line. Crease well and unfold.


Step 3) Fold the top of the model down along the dotted horizontal line. The end points of this horizontal line will line up with the tops of the creases on either side.


Step 4) Petal Fold the top flap of paper up along the dotted line. There is already a crease here from the previous step.


Step 5) Continue lifting up the top flap of paper while folding in the sides along the existing creases.


Step 6) Push everything flat along the existing creases.


Step 7) The completed Petal Fold. Turn the model over and do steps 1 to 7 all over on the other side.


The completed Bird Base.


    Now that you know these things, I think it's time for you to make your first origami on the next lesson! Click the link to your right to fold your first model, the Crane! But if you haven't read the first lesson yet, click the left link!

Previous Lesson                                                                                                    Next Lesson